Tips for Effective Air & Thermal Control Layers

Cross Creek Pointe during construction

In This Article

As the winter weather continues, we wanted to share 9 tips For Effective Air & Thermal Control Layers. Don’t be fooled though, these tips are useful to ensuring your building is properly sealed, insulated, and comfortable no matter what time of year it is

Here is our list of the top 9 compliance items to pay attention to so you can keep your projects on schedule, reduce corrective actions, and meet energy efficiency requirements.

1. Fiberglass batts fit to cavity

Fiberglass batts that are not properly cut to fit cavities are a common cause of compression and misalignment. This prevents the insulation from maintaining full contact with the drywall and exterior sheathing, resulting in reduced efficiency as a thermal control layer when not installed to the manufacturer’s standards. Compressed batts are easy to spot and will give the face of the batt a wrinkly look. This look is a lot better left to Shar-Pei pups and Sphynx cats.

The top batts in the first picture below are installed to Grade 1 specification, setting the gold star standard with minimal gaps and compression. Grade 2 insulation is identifiable by the puckered edges. Like the Sphynx cats, we don’t even want to talk about Grade 3 insulation.

2. Batt is split around electrical boxes, wire runs, and CLP rods

Additional obstacles like electrical boxes, wire runs, and continuous-load-path (CLP) rods in the wall cavity are a tough detail to get right, requiring extra time and attention for insulators with added measuring and cutting. But by not splitting batts accordingly, large pockets of air are created in the cavity causing air circulation that can lead to problems, including comfort issues, in the future.

The first two images show correct installation of batts around obstructions like electrical boxes and wiring. The third image will lead to comfort issues down the road.

3. Batt cut to fit band cavities

We often see an entire batt installed in the band instead of pieces of batt that have been cut and inserted into each band cavity. Insulation should be in full contact with the surface(s) it intends to insulate. This can lead to the same air circulation issues as in #2 because the insulation does not become encapsulated causing it to not work properly and provide its full R-value.

What is R-Value?
R-value is “the capacity of an insulating material to resist heat flow. The higher the r-value, the greater the insulating power.

4. Bottom plates are sealed

Air infiltration can come from any gap in the thermal envelope. Sealing the bottom plates is a common correction that is needed. Gypcrete (gypsum concrete) is generally poured on middle and upper floors, and will act as the air sealant. For the ground floor, those bottom plates will not be sealed with gypcrete and so we need to see an air sealant (most commonly caulk or foam).

Sill seal can also work great as a capillary break (non-porous material) and as an air sealant in many applications. However, proper installation is a challenge as it is ineffective if things are not level, while we often see the sill seal get torn up or displaced after installation. This is why a secondary seal with caulk or foam is necessary. Redundant seals will ensure the building performs better longer.

In the picture below, we can see the sill seal but there is no foam or caulking to act as the air barrier under the bottom plate.

Bottom plates should be sealed with an air sealant on ground level floors

5. Chases are capped and properly sealed

Both horizontal and vertical chases are a common culprit of inadequate thermal and air barriers because they are often not capped and/or sealed. We also see instances where chases are not entirely sealed because the fire caulking only seals penetrations and not the perimeter of the chase. Top floor sealing is mandatory but we encourage sealing all floors to improve performance in all units of the building.

When chases get added later in the framing process, we often see missing backing on the exterior wall. Like all other wall assemblies, the insulation within the chase needs to have six-sided encapsulation to properly work and prevent insulation batts from falling out over time.

6. Doors and windows are properly sealed

A common corrective work item we see involves properly sealing door assemblies when they are installed. It is important to begin sealing at the rough stage when the door is installed. This starts with properly installed house wrap and approved sealants (foam, caulk, etc.). Door and window jambs should then be sealed to the framing.

It is not uncommon for the seal to accidentally be placed between the jamb and the interior side of the house wrap instead of on the other side of the seal toward the doorway.

Doors should be sealed between the house wrap and frame closest to the doorway

7. Insulation between walls adjacent to exterior walls

It is quite common to see uninsulated or underinsulated elevator shafts, stairways, trash chutes, and attic knee walls. Any walls that are adjacent to an unconditioned area should be treated as exterior walls and insulated, including the band (between floors). Although there are a few exceptions, particularly with conditioned stairwells, when in doubt, insulate as if it is exterior.

This wall that is adjacent to an exterior should be insulated.

Exterior walls should be treated as interior walls and insulated

8. Supply boots are sealed to the drywall

It is very rare for a duct leakage test to pass if the supply boots are not sealed to the drywall. If the unit is not passing the duct leakage test on the first try, this is usually the first thing we check.

In the image below, the perimeter of this supply boot should be sealed with caulk.

9. Air handler cabinets and connection to plenum are properly sealed

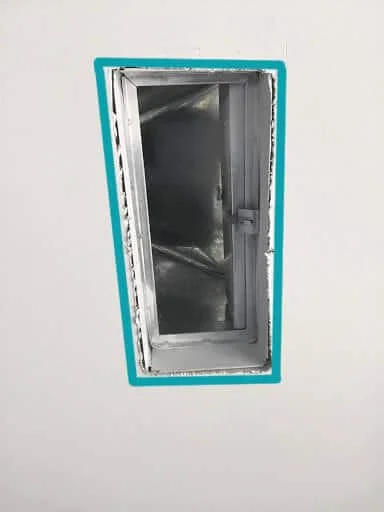
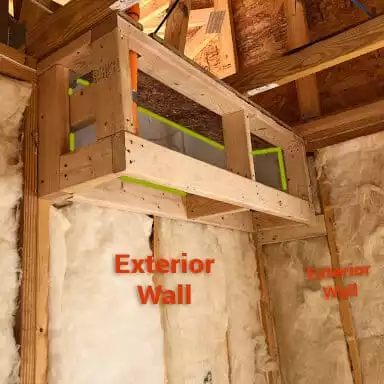
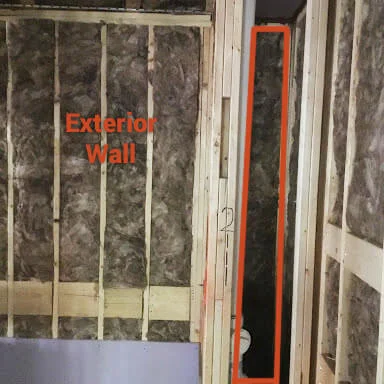
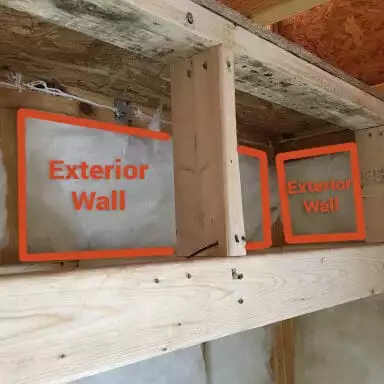
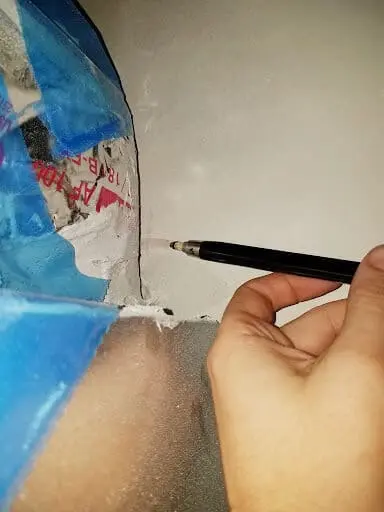
If we pop our head in the air handler and can see drywall, that’s not a good sign. When inspecting the duct system, we will also look in through the fire access damper and shine a light around the outside to find any leaks at the connection between the plenum and ceiling, and between the plenum and air handler. 

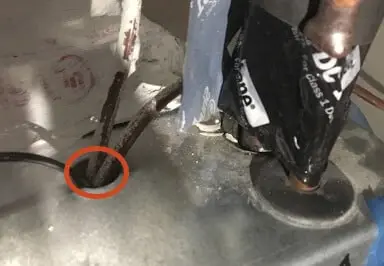
We often find large leaks on the backside of the plenum /air handler connection that cause fails in testing from a lack of mastic and/or tape. In addition, any penetrations or seams in the air handler can be potential sources of leakage that cause a fail. When we test a system, we have to test “as is”, so addressing these items ahead of time will make a more efficient system and increase the likelihood of passing the first time around.

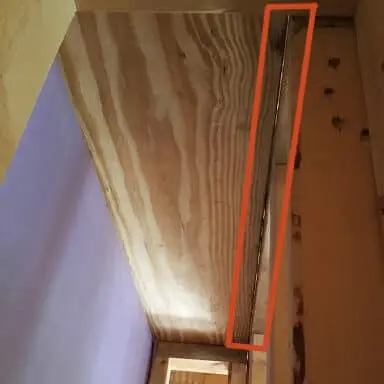
The third image shows a smoke stick test used to indicate leakage.

Bonus Tip: Seal the gap between top plate and sheetrock

For the first time in North Carolina, the 2020 Qualified Allocation Plan has introduced an air infiltration (blower door) target of 5 Air Changes per Hour. It’s particularly difficult to meet ACH targets for Multifamily because each unit/apartment needs to be compartmentalized.

Sealing the top plate to the sheetrock with a gasket will prevent air from coming above into the wall cavities. Check out our blog on top plate gaskets to learn more.

An example of poorly installed sill seal where the material is bumpy and not flat to the surface of the top plate

What's Next?

You bought the right material, so let’s install it right! If you have any questions about the issues you’re seeing on your projects, we’re happy to help. Let us know what’s troubling you so we can boost your project to the finish line.

Are you interested in learning more about energy efficiency strategies or green building certifications? We’d love to chat with you! Schedule a meeting with one of our building science specialists.

Ready to Get Started?

Schedule a meeting with our green building specialists to review your project goals and challenges.